I’ve always been curious about javascript because of the awesome community it has around it and the sheer number of frameworks that are available for it is huge. To learn javascript I was looking for a project. One project I could find to get started with javascript and nodejs was to create a GUI tool for using REPL on ESP8266. Where I could use electronjs to create desktop application and serialport node module for the serial communication.
It was really easy to implement this using javascript, you could get it done within an hour literally from the scratch. Following are the steps to do that.
Install Node
Firstly we need to install Nodejs.
Clone electron Hello-World project.
After installing node, clone the hello world repo for electron and get that
code running.
# Clone the Quick Start repository
$ git clone https://github.com/electron/electron-quick-start
# Go into the repository
$ cd electron-quick-start
# Install the dependencies and run
$ npm install && npm start
Install Serialport
Once that is done. Install serialport library.
$ npm install --save serialport At this point you might need to rebuild the library if it is compiled with a different version of npm previously. for this you will need electron-rebuild tool.
$ npm install --save-dev electron-rebuild
$ ./node_modules/.bin/electron-rebuild
$ npm rebuild
EDIT: As of Jul 2021, this needs an aditional dependency node-gyp to build
this with node version >= 14 process is as follows.
npm install node-gyp electron electron-rebuild serialport --build-from-source
./node_modules/.bin/electron-rebuild
npm start
This should rebuild all electron, node-gyp and serialport from the source with the current node version.
Modify index.html
<!DOCTYPE html>
<html>
  <head>
    <meta charset="UTF-8">
    <title>Electron based gui for micropython REPL over serialport!</title>
  </head>
  <body>
    <h1>Serial terminal</h1>
     <textarea rows="30" cols="50" id="incomingData"></textarea>
     </br>
     <textarea rows="1" cols="50" id="inputText"></textarea>
     </br>
     <input id="button" type="submit" name="button" value="Ctrl+c"/>

    <script>

        //load serialport module
        serialPort = require('serialport');
        const Readline = serialPort.parsers.Readline;

        //initialize serialport with 115200 baudrate.
        var sp = new serialPort('/dev/ttyUSB0', {
            baudRate: 115200,
        });

        //parse incoming data line-by-line from serial port.
        const parser = sp.pipe(new Readline({ delimiter: '\r\n' }));
        parser.on('data', addText);

        //append incoming data to the textarea.
        function addText(event) {
            document.getElementById("incomingData").value += "\n"+event;
        }

        function writeonSer(data){
            //Write the data to serial port.
            sp.write( data, function(err) {
                if (err) {
                    return console.log('Error on write: ', err.message);
                }
                console.log('message written');
            });

        }

        document.getElementById('inputText').onkeypress = function(e){
            if (!e) e = window.event;
            var keyCode = e.keyCode || e.which;
            //write the data to serial when enter key is pressed.
            if (keyCode == '13'){
                //console.log("enter pressed", document.getElementById("inputText").value);
                writeonSer(document.getElementById("inputText").value+"\r\n");
                document.getElementById('inputText').value = "";
                return false;
            }
        }

        document.getElementById('button').onclick = function(e){
            //send ctrl+c to serialport
            writeonSer('\x03');
        }
    </script>
    <script>
        // You can also require other files to run in this process
        require('./renderer.js')
    </script>
  </body>
</html>
Edit: As of Jul 2021, you can’t call native node code from electron. In order to do that you need to add a couple of things in the main.js.
In main.js add app.allowRendererProcessReuse = false;.
Also while creating the BrowserWindow, modify webPreferences to.
webPreferences: {
      preload: path.join(__dirname, 'preload.js'),
      nodeIntegration: true,
      contextIsolation: false
}
With this change, you will be able to access native node modules in the rendering process.
Once this is done, connect the device that you are using for serial
communication to your computer and run the following command.
Just make sure the file name at which the device is mounted is correct in the
above code.
in this example the file name was /dev/ttyUSB0
var sp = new serialPort('/dev/ttyUSB0', {
    baudRate: 115200,
});
Run the application
$ npm startYou will see the output like this:
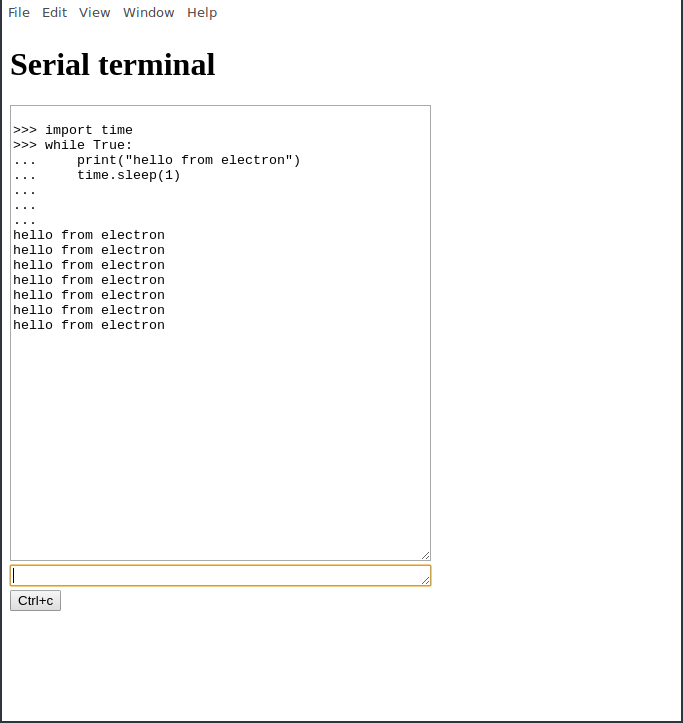
Now you can access the micropython REPL using this GUI.